
Most effective technical indicators for profitable day trading strategies? Ah, the holy grail of the fast-paced, adrenaline-fueled world of day trading! Think of it: you, armed with nothing but a laptop, a caffeine IV drip, and a finely honed understanding of market movements, conquering the financial battlefield one meticulously planned trade at a time. But before you picture yourself lounging on a yacht fueled by day-trading profits, let’s face it: it’s a jungle out there.
This guide will navigate you through the dense undergrowth of technical indicators, helping you identify the most effective tools to boost your chances of success (and hopefully avoid a financial Darwinian extinction event).
We’ll explore the fascinating world of trend-following indicators like moving averages (think of them as the seasoned veterans of the market, always pointing the way), momentum indicators such as RSI and Stochastic Oscillator (the nimble, quick-witted scouts, detecting shifts in market sentiment), and volatility indicators like Bollinger Bands and ATR (the risk managers, helping you navigate the market’s wild swings).
We’ll also delve into the art of combining these indicators for enhanced accuracy, because let’s be honest, relying on a single indicator is like navigating a maze blindfolded. Finally, we’ll cover crucial risk management strategies, because even the best-laid plans can go sideways in the blink of an eye. Buckle up, it’s going to be a wild ride!
Introduction to Day Trading and Technical Indicators: Most Effective Technical Indicators For Profitable Day Trading Strategies?
Day trading, the thrilling (and sometimes terrifying) practice of buying and selling assets within the same trading day, is a high-octane pursuit. Think of it as financial Formula 1 – exhilarating speed, sharp turns, and the constant risk of a spectacular crash. The potential for quick profits is undeniable, but so is the potential for equally quick losses.
It’s a game best played with a cool head, a solid strategy, and a healthy dose of risk management – otherwise, your day trading dreams might end up looking more like a demolition derby.Technical indicators are the pit crew of the day trading world. They provide crucial information, analyzing price charts and volume data to help traders identify potential trading opportunities and manage risk.
So, you’re hunting for the holy grail of day trading indicators? Forget crystal balls, the real magic lies in knowing your tools. But first, you need a robust platform – check out What’s the best platform for day trading with options and futures? to find the right battlefield for your indicator-wielding skills. Then, and only then, can you truly master those RSI, MACD, and Bollinger Band shenanigans for maximum profit (or minimum loss, let’s be realistic!).
They don’t guarantee success – no crystal ball exists in the financial markets – but they offer valuable insights to inform trading decisions. Think of them as sophisticated tools that can help you navigate the twists and turns of the market, but ultimately, you’re still the one behind the wheel.
Types of Technical Indicators
Technical indicators are categorized based on what aspect of the market they analyze. Understanding these categories is key to selecting the right tools for your trading style. Some indicators focus on identifying trends, others on momentum shifts, and still others on market volatility. Choosing the right combination depends on your trading strategy and risk tolerance. A diversified approach, using a combination of indicators, is often more effective than relying on a single one.
Examples of Technical Indicators
Trend-following indicators, like moving averages (simple moving average or exponential moving average), smooth out price fluctuations to highlight the overall direction of the market. Momentum indicators, such as the Relative Strength Index (RSI) and the Moving Average Convergence Divergence (MACD), measure the speed and strength of price changes, helping identify potential buy or sell signals based on overbought or oversold conditions.
Volatility indicators, such as the Average True Range (ATR), quantify price fluctuations, helping traders assess risk and adjust position sizes accordingly. Imagine a seasoned race car driver – they don’t just rely on their instincts; they use a variety of instruments and data to make informed decisions. Similarly, effective day traders leverage multiple technical indicators.
So, you’re wrestling with the age-old question: What are the most effective technical indicators for profitable day trading strategies? The answer, my friend, is blowing in the wind… or maybe it’s on a screen? To really nail those indicators, you need a top-notch platform, like the one found here: Top-rated platform for day trading in Canada with advanced charting?
With killer charting, you’ll spot those sweet indicator patterns a mile away, making your day trading dreams a reality (or at least a slightly less stressful experience). Then, it’s back to mastering those indicators!
Comparison of Common Technical Indicators
The following table compares five common technical indicators, highlighting their strengths and weaknesses. Remember, each indicator works best in specific market conditions, and combining them can provide a more holistic view. Don’t treat this as an exhaustive list; the world of technical indicators is vast and ever-evolving!
| Indicator | Type | Strengths | Weaknesses |
|---|---|---|---|
| Simple Moving Average (SMA) | Trend-following | Easy to understand and calculate; good for identifying long-term trends. | Lagging indicator; susceptible to whipsaws in choppy markets. |
| Exponential Moving Average (EMA) | Trend-following | More responsive to recent price changes than SMA; better for shorter-term trends. | More complex to calculate than SMA; still susceptible to whipsaws. |
| Relative Strength Index (RSI) | Momentum | Identifies overbought and oversold conditions; can signal potential reversals. | Can generate false signals; prone to divergence. |
| Moving Average Convergence Divergence (MACD) | Momentum | Identifies changes in momentum; useful for confirming trends and spotting potential reversals. | Can be complex to interpret; requires practice and experience. |
| Average True Range (ATR) | Volatility | Measures market volatility; helps in determining stop-loss levels and position sizing. | Doesn’t predict future volatility; only reflects past price fluctuations. |
Trend-Following Indicators
Riding the wave of the market – that’s the dream of every day trader, and trend-following indicators are your surfboard. These tools help you identify the direction of the market’s momentum and, if you’re lucky, catch some seriously profitable rides. But remember, even the best surfboard won’t save you from a rogue wave, so risk management is still your life vest.
Moving Averages: Smoothing Out the Chaos
Moving averages are like a magic smoothing iron for your price charts, ironing out the daily noise to reveal the underlying trend. They calculate the average price over a specific period, creating a smoother line that’s easier to interpret. There are several types, each with its own personality:
- Simple Moving Average (SMA): This is the simplest type, calculating the average price over a defined number of periods. Think of it as the average Joe of moving averages – straightforward and easy to understand. A 50-day SMA, for instance, averages the closing prices of the last 50 days.
- Exponential Moving Average (EMA): This gives more weight to recent prices, making it more responsive to recent changes in price. Imagine it as the trendsetter – quicker to react to shifts in momentum than the SMA. A 20-day EMA would place greater importance on the most recent 20 days’ prices.
- Weighted Moving Average (WMA): This allows you to assign different weights to each period, giving more emphasis to specific periods as deemed important. It’s the customizable option, letting you fine-tune your focus on recent or past data. A WMA might, for example, give greater weight to the last 5 days out of a 20-day period.
The choice between SMA, EMA, and WMA depends on your trading style and risk tolerance. Fast moving averages (shorter periods) are more sensitive to price fluctuations, leading to more frequent trading signals (and potentially more whipsaws!), while slower moving averages (longer periods) are smoother but may lag behind significant market shifts.
MACD: The Trend Whisperer
The Moving Average Convergence Divergence (MACD) is a trend-following momentum indicator that uses two exponential moving averages (typically 12-day and 26-day EMAs) to identify changes in momentum. It’s like having a secret agent whispering trend insights into your ear. The MACD line itself oscillates above and below a signal line (often a 9-day EMA of the MACD), generating buy and sell signals through crossovers.
So, you’re hunting for the holy grail of day trading indicators? Forget crystal balls, the real magic lies in knowing your tools. But first, you need a robust platform – check out What’s the best platform for day trading with options and futures? to find the right battlefield for your indicator-wielding skills. Then, and only then, can you truly master those RSI, MACD, and Bollinger Band shenanigans for maximum profit (or minimum loss, let’s be realistic!).
Divergences between the MACD and price action can also hint at potential trend reversals.For example, a bullish divergence occurs when the price makes lower lows, but the MACD makes higher lows. This suggests that buying pressure may be increasing despite the downward price movement, hinting at a possible upward trend reversal. The opposite is true for bearish divergences.
So, you’re hunting for the holy grail of day trading indicators? Forget crystal balls, the real magic lies in knowing your tools. But first, you need a robust platform – check out What’s the best platform for day trading with options and futures? to find the right battlefield for your indicator-wielding skills. Then, and only then, can you truly master those RSI, MACD, and Bollinger Band shenanigans for maximum profit (or minimum loss, let’s be realistic!).
A Hypothetical Moving Average Crossover Strategy
Let’s say we’re using a 50-day SMA and a 200-day SMA. Entry: We’d buy when the 50-day SMA crosses above the 200-day SMA (a “golden cross”), indicating a potential uptrend. We’d sell when the 50-day SMA crosses below the 200-day SMA (“death cross”), suggesting a potential downtrend. Exit: We could use a trailing stop-loss order to protect profits or exit based on a reversal signal (e.g., another crossover or a significant price drop).
Alternatively, we could set a time-based exit, such as closing the position at the end of the day.This strategy is incredibly simplistic and should be refined with additional risk management tools. It doesn’t account for market volatility or other factors that could impact price movements. It serves as a basic illustration.
Comparing Moving Average Performance
Imagine a stock price chart showing a gradual uptrend. A fast EMA (e.g., 10-day) would closely follow the price, reacting quickly to each upward movement. A slower SMA (e.g., 50-day) would lag behind, providing a smoother representation of the overall trend but missing some of the short-term gains. In a volatile market, the fast EMA might generate false signals, while the slower SMA would remain more stable but potentially miss out on some profit opportunities.
The ideal choice depends on your individual risk tolerance and trading goals. In a sideways market, neither may be very helpful, highlighting the need for a diversified approach and risk management.
Momentum Indicators
Momentum indicators are the unsung heroes of day trading – the thrill-seekers, the adrenaline junkies of the technical analysis world. They don’t just tell you
- where* the price is going; they whisper secrets about the
- speed* and
- strength* of that movement. Understanding these indicators can be the difference between a graceful profit-taking exit and a panicked, loss-cutting scramble.
RSI (Relative Strength Index) and Stochastic Oscillator Function
The RSI and Stochastic Oscillator are two popular momentum indicators that measure the speed and change of price movements. Think of them as the speedometer and tachometer of your trading vehicle. The RSI, ranging from 0 to 100, compares the magnitude of recent price gains to recent price declines. A high RSI suggests strong upward momentum, while a low RSI indicates weakening momentum or potential downward pressure.
The Stochastic Oscillator, also ranging between 0 and 100, compares a security’s closing price to its price range over a given period. It’s particularly sensitive to short-term price swings, making it a favorite among day traders who thrive on quick moves. Both provide signals about potential overbought and oversold conditions, and importantly, can highlight divergences from the underlying price action.
Overbought and Oversold Conditions in Day Trading
Imagine a racehorse sprinting at full speed. Eventually, it needs to slow down, right? That’s the principle behind overbought and oversold conditions. An RSI above 70 is generally considered overbought, suggesting the price has risen too quickly and a correction might be imminent. Conversely, an RSI below 30 is often seen as oversold, hinting at a potential price bounce.
Similarly, a Stochastic Oscillator above 80 suggests overbought conditions, while below 20 indicates oversold conditions. However, it’s crucial to remember these are guidelines, not hard and fast rules. Markets can remain overbought or oversold for extended periods, especially during strong trends. For example, during the 2020-2021 tech stock boom, many stocks stayed overbought for months. A day trader might use these levels as potential entry or exit points, looking for a pullback in an overbought market or a breakout from an oversold one.
Interpreting Price and Momentum Indicator Divergence
Divergence occurs when the price action and a momentum indicator tell conflicting stories. For instance, imagine the price of a stock makes a series of higher highs, but the RSI makes a series of lower highs. This is a bearish divergence, suggesting weakening upward momentum and a potential price reversal. Conversely, a bullish divergence happens when the price makes lower lows, but the RSI makes higher lows, signaling a possible upward trend reversal.
This is like a car whose engine is revving (high RSI) despite the car slowing down (lower price). Identifying these divergences can provide early warning signals of potential trend changes, giving day traders a valuable edge. Consider the case of Apple in early 2023. While the price showed a minor dip, the RSI failed to reach a new low, creating a bullish divergence that preceded a price rebound.
RSI Levels and Interpretations
| RSI Level | Interpretation | Possible Day Trading Action | Caveats |
|---|---|---|---|
| 0-30 | Oversold | Consider long positions (buying), looking for a bounce. | False signals can occur; confirm with other indicators. |
| 30-70 | Neutral | Monitor price action and other indicators for confirmation. | Trend could continue or reverse; requires further analysis. |
| 70-100 | Overbought | Consider short positions (selling), looking for a pullback. | Strong trends can stay overbought for extended periods. |
Volatility Indicators
Day trading, that thrilling rollercoaster of buying and selling within the same day, demands a keen understanding of market volatility. Volatility, the measure of price fluctuations, isn’t just some abstract concept; it’s the wild beast you need to tame to survive (and thrive!) in the day trading jungle. Ignoring volatility is like driving a Formula 1 car blindfolded – exciting, perhaps, but ultimately disastrous.
Understanding and utilizing volatility indicators is crucial for navigating the market’s unpredictable swings and maximizing your profit potential (while minimizing your losses, of course!).Volatility indicators help day traders gauge the potential for significant price movements. High volatility signals potentially larger profits, but also carries a higher risk of substantial losses. Conversely, low volatility suggests smaller price swings, implying potentially smaller profits but also reduced risk.
The key is to use these indicators to your advantage, strategically adjusting your trading approach based on the market’s mood.
Bollinger Bands: Charting Volatility and Potential Breakouts
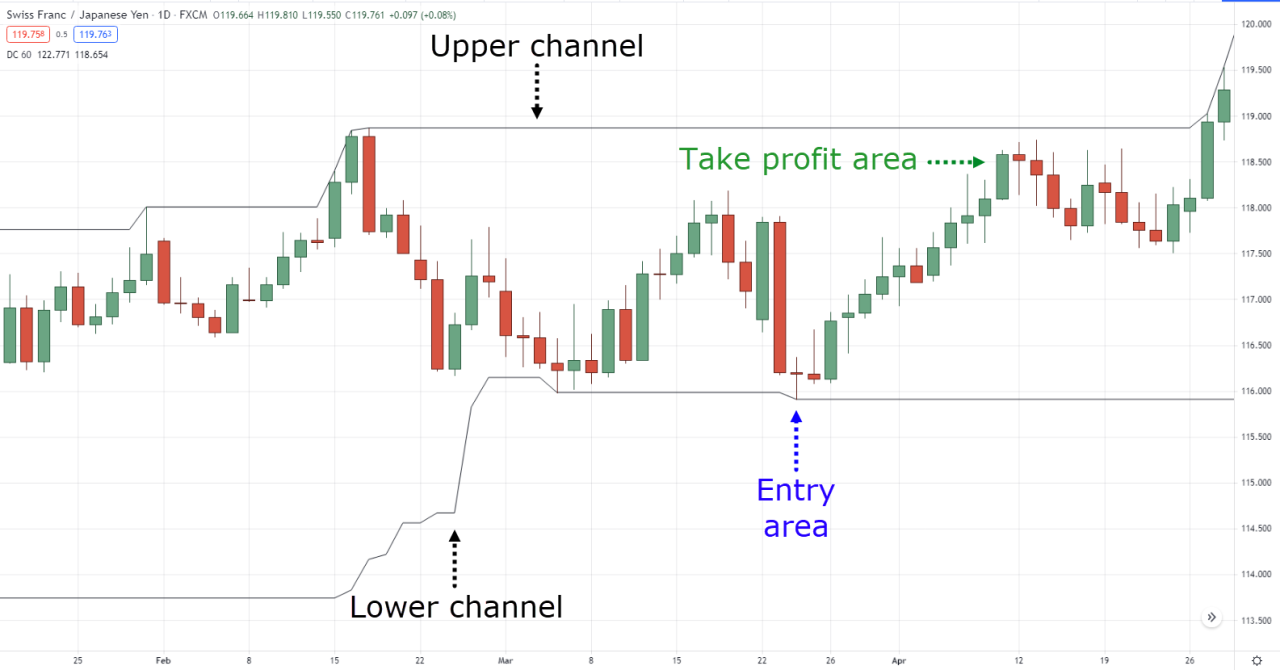
Bollinger Bands are a technical analysis tool that visually represents volatility through a set of three lines plotted on a price chart. The middle band represents a simple moving average (SMA), typically a 20-period SMA, while the upper and lower bands are positioned a standard deviation above and below the SMA, respectively. The distance between the bands widens during periods of high volatility and narrows during periods of low volatility.Breakouts from the Bollinger Bands often signal significant price movements.
A break above the upper band can indicate a bullish breakout, while a break below the lower band might signal a bearish breakout. However, it’s crucial to remember that these are not guarantees. False breakouts can occur, especially in sideways markets. Therefore, it’s advisable to use Bollinger Bands in conjunction with other indicators and confirmation signals to improve accuracy.
Imagine the bands as a spring – the wider they are, the more potential energy (and potential price movement) they hold.
Average True Range (ATR): Managing Risk and Position Sizing
The Average True Range (ATR) is a technical indicator that measures market volatility by calculating the average range of price movement over a specified period. Unlike Bollinger Bands which focus on price, ATR focuses on the range. A higher ATR value indicates higher volatility and a greater potential for larger price swings. Conversely, a lower ATR value suggests lower volatility and smaller price movements.The ATR’s primary application in day trading is risk management and position sizing.
Traders often use the ATR to determine appropriate stop-loss levels and to calculate the size of their trades. For example, a trader might set a stop-loss order two times the ATR below their entry price, thereby limiting potential losses. Similarly, they might adjust their position size based on the ATR, reducing the number of shares traded during periods of high volatility to control risk.
Think of ATR as your safety net – the higher the volatility, the wider the net needs to be.
Bollinger Bands vs. Average True Range: A Comparative Analysis
Bollinger Bands and ATR, while both measuring volatility, provide different perspectives. Bollinger Bands offer a visual representation of price volatility and potential breakouts, directly on the price chart. They are excellent for identifying potential trend reversals and breakouts. However, they can generate false signals in sideways markets, leading to unnecessary trades.The ATR, on the other hand, provides a quantifiable measure of volatility, independent of price.
This makes it an ideal tool for risk management and position sizing. It doesn’t directly predict price movements but provides a valuable framework for controlling risk. The ATR excels in managing risk and determining trade size but doesn’t provide direct signals for entry or exit points like Bollinger Bands. The choice between them depends on your trading style and priorities.
Some traders might use both indicators in conjunction for a more comprehensive understanding of the market’s volatility and to enhance their trading decisions. Imagine them as a detective duo – Bollinger Bands, the sharp-eyed observer, and ATR, the meticulous data analyst. Together, they make a formidable team.
Combining Indicators for Enhanced Accuracy
Day trading, my friend, is a rollercoaster of emotions and potential profits (or losses!). Relying on a single technical indicator is like navigating that rollercoaster blindfolded – risky, to say the least. Combining indicators, however, is like strapping on a helmet and getting a detailed map; it significantly increases your chances of a smooth, profitable ride. This involves using multiple indicators to confirm signals, filter out noise, and ultimately, make smarter trading decisions.Combining indicators isn’t just about throwing darts at a board and hoping for the best.
It’s a strategic approach that requires understanding how different indicators interact and complement each other. The key is to choose indicators that measure different aspects of the market, such as price trend, momentum, and volatility. By combining these perspectives, you create a more holistic view of the market’s current state and potential future movements. This synergistic approach allows for a more robust and reliable trading strategy.
Confirmation Signals and False Signals Reduction
Confirmation signals are the holy grail of day trading. They occur when multiple indicators point towards the same trading decision – a buy or a sell. For example, if both a moving average crossover and a bullish RSI divergence signal a buy, you have a much stronger confirmation than relying on either indicator alone. This significantly reduces the risk of false signals, those pesky moments where an indicator suggests a trade that doesn’t pan out.
False signals can lead to unnecessary losses, so confirmation is crucial for minimizing these costly mistakes. Think of it like this: one indicator might be a slightly unreliable friend, always offering advice, but several indicators in agreement are like a trusted panel of experts.
Effective Indicator Combinations and Their Applications
Let’s explore some powerful indicator duos (and trios!) and how they work in practice.
- Moving Average Crossover + RSI: A classic combination. A golden cross (short-term moving average crossing above a long-term moving average) suggests a bullish trend. If this is accompanied by an RSI above 50 (indicating bullish momentum), you have a strong buy signal. Conversely, a death cross (short-term moving average crossing below a long-term moving average) coupled with an RSI below 30 points towards a strong sell signal.
This combination works well in trending markets.
- MACD + Bollinger Bands: The MACD (Moving Average Convergence Divergence) shows momentum shifts, while Bollinger Bands highlight volatility. A bullish MACD crossover combined with the price bouncing off the lower Bollinger Band suggests a potential buying opportunity. This combination is particularly useful in sideways or consolidating markets, where breakouts are often key trading events.
- Stochastic Oscillator + Volume: The Stochastic Oscillator identifies overbought and oversold conditions, while volume confirms the strength of the price movement. An oversold Stochastic reading coupled with increasing volume suggests a potential reversal to the upside. This is a powerful combination for identifying potential bounce points in downtrends.
These are just a few examples; the possibilities are vast. The key is to experiment and find combinations that suit your trading style and risk tolerance. Remember, what works for one trader might not work for another.
Flowchart of a Day Trading Strategy Integrating Multiple Technical Indicators
Imagine a flowchart. It starts with market open. First, we check the 20-period and 50-period moving averages for a crossover. If a golden cross is detected, AND the RSI is above 50, AND volume is increasing, THEN initiate a long position. If a death cross is detected, AND the RSI is below 30, AND volume is decreasing, THEN initiate a short position.
If none of these conditions are met, we move to the next step: checking for Bollinger Band bounces. If the price is bouncing off the lower band, and the MACD is showing bullish momentum, THEN initiate a long position. If the price is bouncing off the upper band, and the MACD is showing bearish momentum, THEN initiate a short position.
If still no signal, we wait for the next opportunity. This is a simplified example, and a real-world strategy would require more detailed rules and risk management parameters. Remember to always use stop-loss orders to protect your capital!
So, you’re hunting for the holy grail of day trading indicators? Forget crystal balls, the real magic lies in knowing your tools. But first, you need a robust platform – check out What’s the best platform for day trading with options and futures? to find the right battlefield for your indicator-wielding skills. Then, and only then, can you truly master those RSI, MACD, and Bollinger Band shenanigans for maximum profit (or minimum loss, let’s be realistic!).
Risk Management and Money Management Techniques
Day trading, while potentially lucrative, is a high-stakes game. Think of it as a thrilling rollercoaster – exhilarating highs and stomach-churning lows. To avoid ending up splattered on the track, a robust risk and money management plan is absolutely crucial. It’s not about eliminating risk entirely (that’s impossible!), but about controlling it, minimizing potential losses, and maximizing the chances of long-term success.
Without a solid strategy, even the most brilliant technical analysis will be rendered useless.Risk management in day trading isn’t just about protecting your capital; it’s about preserving your sanity. Imagine losing a significant portion of your trading account in a single day – not only is it financially devastating, but it can also severely impact your confidence and ability to make rational trading decisions going forward.
A well-defined risk management plan acts as a safety net, preventing catastrophic losses and allowing you to weather the inevitable market storms.
Stop-Loss Orders and Their Implementation
Stop-loss orders are your best friends in the turbulent world of day trading. They’re automatic orders that sell your asset when it reaches a predetermined price, limiting your potential losses. Think of them as a built-in emergency brake for your trading vehicle. For example, if you buy a stock at $100, you might set a stop-loss order at $95.
If the price drops to $95, your order is automatically executed, preventing further losses. The key is to set your stop-loss orders strategically, considering factors like volatility and your risk tolerance. Setting them too tightly can lead to frequent whipsaws (being stopped out of profitable trades), while setting them too loosely can result in significant losses. The ideal stop-loss level is often determined by support levels identified through technical analysis, or a percentage of your entry price (e.g., 2-5%).
Position Sizing: Determining Appropriate Trade Sizes
Position sizing is about determining how much capital to allocate to each trade. It’s not about betting the farm on a single trade; instead, it’s about diversifying your risk across multiple trades. A common rule of thumb is to risk no more than 1-2% of your total trading capital on any single trade. For instance, if your trading account has $10,000, you shouldn’t risk more than $100-$200 on a single trade.
This approach prevents a single losing trade from wiping out a substantial portion of your account. Adjusting position size based on market volatility is also crucial; in highly volatile markets, you might reduce your position size to further mitigate risk.
Effective Money Management Strategies for Day Traders, Most effective technical indicators for profitable day trading strategies?
Effective money management goes hand-in-hand with risk management. It involves carefully planning how you will allocate your capital, track your performance, and manage your emotions. A crucial aspect is maintaining a trading journal, meticulously documenting each trade, including entry and exit points, reasons for the trade, and the outcome. This journal provides invaluable insights into your trading performance, allowing you to identify patterns, strengths, and weaknesses.
Another important strategy is setting realistic profit targets. Don’t get greedy; aim for consistent, smaller profits rather than chasing unrealistic gains. Finally, remember that day trading is a marathon, not a sprint. Avoid emotional trading decisions based on fear or greed, and stick to your trading plan.
So, you’re hunting for the holy grail of day trading indicators? Forget crystal balls, the real magic lies in knowing your tools. But first, you need a robust platform – check out What’s the best platform for day trading with options and futures? to find the right battlefield for your indicator-wielding skills. Then, and only then, can you truly master those RSI, MACD, and Bollinger Band shenanigans for maximum profit (or minimum loss, let’s be realistic!).
A Sample Risk Management Plan
This plan combines stop-loss orders, take-profit orders, and position sizing to create a comprehensive risk management strategy.
Scenario: You have a $5,000 trading account and identify a trading opportunity in stock XYZ. Your analysis suggests a potential upside of 3% and you are willing to risk 1% of your account on this trade.
Step 1: Position Sizing: 1% of $5,000 is $50. This is your maximum risk for this trade.
Step 2: Stop-Loss Order: Determine your stop-loss price based on technical analysis or a percentage below your entry price. Let’s say your entry price is $50 and you set your stop-loss at $48, representing a 4% stop.
Step 3: Take-Profit Order: Based on your analysis, you aim for a 3% profit. If your entry price is $50, your take-profit order would be set at $51.50.
Step 4: Monitoring and Adjustment: Continuously monitor the trade and the market conditions. Be prepared to adjust your stop-loss order if necessary, based on shifting market dynamics. Never hesitate to exit a trade if it’s not performing as expected.
This is a basic example, and the specific parameters will vary depending on the individual trade and market conditions. The core principle remains consistent: carefully manage your risk to protect your capital and maximize your chances of long-term success.
Backtesting and Optimization

Before you unleash your day trading strategy upon the volatile world of the market, a crucial step awaits: backtesting. Think of it as a rigorous trial run, where your strategy faces the scrutiny of historical data instead of risking your hard-earned cash. It’s like test-driving a car before buying it – you wouldn’t buy a lemon, would you?Backtesting allows you to evaluate the performance of your trading strategy using historical market data.
It’s a virtual playground where you can refine your approach, identify weaknesses, and boost your chances of success before putting real money on the line. Without it, you’re essentially gambling, and we all know how that can end.
The Backtesting Process
The process involves feeding your chosen strategy’s rules (entry and exit points, indicator signals, etc.) into software designed for backtesting. This software then simulates your strategy’s trades using historical price data, generating a performance report that includes key metrics like win rate, average profit/loss, maximum drawdown, and Sharpe ratio. Imagine it as a detailed report card for your strategy, highlighting its strengths and areas for improvement.
For example, you might use software like TradingView, MetaTrader, or custom-built platforms to perform this analysis. The key is to select a sufficiently long historical dataset to capture a variety of market conditions – bull markets, bear markets, and sideways trends.
Optimizing a Day Trading Strategy
Backtesting doesn’t just show you how your strategyperformed*; it reveals how to make it
better*. Let’s say your backtest reveals that your strategy performs exceptionally well during high-volatility periods but poorly during low-volatility periods. This suggests an optimization opportunity. You might adjust your entry/exit rules to be more conservative during low-volatility periods, perhaps incorporating additional filters based on volume or other indicators. Alternatively, you could entirely revise your approach for low-volatility conditions, perhaps switching to a mean-reversion strategy rather than a trend-following one. This iterative process of testing, analyzing, and refining is key to building a robust and profitable strategy. For instance, if your backtest shows a high number of losing trades resulting from false signals, you might adjust your indicator parameters to increase the signal-to-noise ratio. Another example
if your maximum drawdown is too high, you could modify your position sizing or add stop-loss orders to mitigate risk.
Limitations of Backtesting and the Importance of Forward Testing
While backtesting is incredibly valuable, it’s not a crystal ball. It’s crucial to remember that past performance doesn’t guarantee future results. Market conditions change, and what worked in the past might not work in the future. Furthermore, backtesting often relies on clean, historical data which might not perfectly reflect the complexities and nuances of real-time trading, including slippage, commissions, and emotional factors.
Therefore, after backtesting and optimization, forward testing (testing your strategy on live market data with a small amount of capital) is crucial to validate its effectiveness and adapt to the real world of trading. Think of it as a final exam before you fully commit to the strategy in live trading. This allows you to observe how the strategy behaves under real market conditions, incorporating the effects of slippage, commissions, and emotional influences, all of which are often absent from backtested results.
This step is critical in building confidence and ensuring the strategy’s viability.
Final Review

So, there you have it – a whirlwind tour through the world of technical indicators for day trading. Remember, while these tools can significantly enhance your trading strategy, they’re not magic bullets. Mastering day trading requires a blend of technical prowess, disciplined risk management, and a healthy dose of patience (and perhaps a strong stomach). The market is a fickle beast, prone to unexpected twists and turns, but with the right knowledge and approach, you can increase your odds of navigating its unpredictable currents and emerging victorious.
Now go forth, armed with your newfound knowledge, and may your trades always be green!